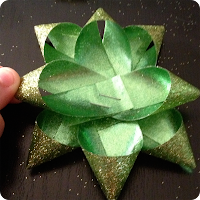
Tutorial: DIY Gift Bow
This tutorial will teach you how to make your own gift bows for all your Holiday gifts!
(Or just gifts in general!)
Items Needed:
- Ribbon (I used a 7/8" width ribbon that has the same color on both sides)
- Scissors
- Stapler and Staples (or use tape, but I preferred using a stapler)
- Double Sided Tape (you're going to need this regardless)
- Tape (Regular Tape)
- Ruler
Step One:
Using your ruler, measure out your ribbon and cut them into the following sized pieces:
- 3 pieces at 11 inches
- 3 pieces at 10 inches
- 2 pieces at 9 inches
- 1 piece at 3.5 inches
(You can alter the pieces in size, but make sure you keep the ratios within an inch from each other so you don't have crazy sizes that obstruct the bow shape.)
Step Two:
Take the 3.5 inch piece and create a circle by taping the ends together.
(For each of the other ribbons repeat Steps Three through Six)
Step Three:
Take one of the larger pieces (we will begin with one of the 11 inch pieces) and fold one of the ends over to create a loop.
Step Four:
Holding the loop firmly, create a loop with the other end, making sure that the loop is coming in from the opposite direction.
Step Five:
Make sure that both ends are creating tight points by making sure the ends are overlapping in the center.
Step Six:
Holding both ends together staple (or use double-sided tape) the ends directly in the center of the ribbon.
(As stated above, repeat these steps for the remaining ribbons.)
Step Seven:
Starting with the larger pieces, place the pieces between each other, as shown below.
Step Eight:
Staple (or tape) pieces together.
Step Nine:
Repeat the same process for all pieces, making sure you rotate them appropriately, until you only have the small 3.5 inch rolled piece left.
Step Ten:
Take the 3.5 inch rolled piece and apply a piece of Double Sided Tape to the bottom of it.
Step Eleven:
Place the 3.5 inch roll in the center of the wrapped ribbons (which should now have a bow look to it).
And you're done!


0 comments:
Post a Comment